jueves, 6 de agosto de 2020

How does for loop works in Java?

 For loop


A loop is nothing more than a repetitive control structure that can execute instructions multiple times, in java there are various loops like:


do/while

        do {

           //Execution block

        } while (condition);


while:

        while (condition) {

            //Execution block

        }


for:


        for (int i = 0; i < args.length; i++) {

            //Execution block

        }


enhanced for (for each):

        for (String string : args) {

             //Execution block

        }


In this post we are going to focus on the regular for and the enhanced for (for each), we are going to see how both loops works and what are their differences.


The regular for loop in java is primary used to executed repetitive code, for example iterate through an array, print multiple messages, etc. 


As we can see in the declaration of the for loop, this is composed of:

  • key statement:  for
  • block of variable initializationint i = 0
  • block of conditional checking:  i < 10
  • block where the variables are incrementedi++
  • and the execution block: //any code to be executed 


Most people can think that the step in which the regular for loop is executed is as showing in its declaration, but not, the steps that the JVM follow to execute a regular for loop are as follow:

  1. first the block of variable initialization is executed, in this block you initialize the variables that are going to be used in the for loop, you can have multiple var initialization, or even don't have any var initialization at all, as follow:

        for (int i = j = 0; i < 10; i++) {

            //Execution block

        }


in this example, if you are declaring an initializing more than one variable, these variables have to be of the same type and you have to set its value at the same time.


        you can have the var declaration outside de for loop, as follow:

        int i;

        int j;

        double d;

        for (i = 0, j = 0, d = 1.0; i < 10; i++) {

            //Execution block

        }


in this case you can have multiple variables of multiple types and you can initialize those variables using a comma separator.


2.     once all the variables are initialized, the next step is executing the block of conditional checking, this is the part where the program check if the for loop a meets the criteria to continue running.

  1. after the conditional checking is executed, the next step is executing the code block inside the for loop
  2. the final step is check block where the variables are incremented

these steps are repeated over and over again, going to the step 2 to check the conditional checking, then to the step 3 execution block inside the for loop and then the block where the variables are incremented, and so on until the for loop meets the criteria to continue running.

It is worth to mention that the block where the variables are incremented have to be a statement that return a value, in this case i++ return the value of i and then increment its value, of example if you have a for as follow: when you attempt to add 2 to the variable i the code will not compile:

        for (int i = 0; i < 10; i + 2) {

           //Execution block

        }


The enhanced for loop (for each) is not much different of the regular loop, it is just a way to use a for loop without worrying about the conditional checking and the incremental checking.

The enhanced for loop only works on collections that implements the iterator interface, this loop is just a help for the developer, once you compile your program, the compiler translates the for loop to a regular while loop if you are using a collection or to a regular for loop if you are using an array, let see an example:

List<Integer> list = new ArrayList<>(List.of(1,2,3,4));
for
(Integer var:list) {
    System.
out.println(var);
}

is compiled and translated to:

List<Integer> list = new ArrayList(List.of(1, 2, 3, 4));
Iterator var2 = list.iterator();

while
(var2.hasNext()) {
    Integer var = (Integer)var2.next()
;
   
System.out.println(var);
}


String[] string = {"1","2","3", "4"};
for
(String str: string) {
    System.
out.println(str);
}

is compiled and translated to:

String[] string = new String[]{"1", "2", "3", "4"};
String[] var8 = string;
int
var4 = string.length;

for
(int var5 = 0; var5 < var4; ++var5) {
    String str = var8[var5]
;
   
System.out.println(str);
}


 As you can see the enhanced for loop is translated to a regular loop when you compiled your code which indicate that the compiler will handle all the complexity of manage the conditional checking and incremental variable for us, which result in cleaner and easy to read code.

I hope this post will help you understand how for loops works in Java, this can be an easy topic at first glance but having a good understanding of this topics will help you to face interviews or solving certification exams.


s谩bado, 18 de julio de 2020

Naming conflicts in Java


@jwimmerli


In Java there are situations that you have to use a class that have the same name but resides in different packages, for example the Date class, you can find a implementation of the Date class in the package java.util  and in the package java.sql , both classes have similarities but work for different purposes.

What if you have to use both classes ( java.util.Date and  java.sql.Date  ) in a class of your program, how you can deal with the naming collision  that you have if you try to import both classes.

Let's see the following example to have a clear idea of the problem that we are trying to solve:
in the following snippet of code we have a class named Comment that is declaring two variables of type Date:
package mysite;

import java.util.Date;
import java.sql.Date; // this import will throw an error: The import java.sql.Date collides                         // with another import statementJava(268435842)
public class Comment {
private Date date;
private Date dateSql;

public Comment(Date date, Date dateSql){
this.date = date;
        this.dateSql = dateSql;
}

public Date getDate(){
return this.date;
}
public Date getDateSql(){
return this.dateSql;
}
}

As  you can see,  if you try to import a class with the same name, you will have a compiler time error indicating that the second class that your are importing collides with the first class,  in this case java.sql.Date  collides with the  java.util.Date

You can solve this naming conflict in several ways, but I recommend you, if you are having this type of naming collisions, always use the full qualified name declaration to remove ambiguity and make your code easier to read.
In this case, I remove all the explicit imports and declare the variables using FQN, as you can see in the following code snippet:

package mysite;


public class Comment {

private java.util.Date date;
private java.sql.Date dateSql;

public Comment(java.util.Date date, java.sql.Date dateSql){
this.date = date;
this.dateSql = dateSql;
}


public java.util.Date getDate(){
return this.date;
}
public java.sql.Date getDateSql(){
return this.dateSql;
}
}

This is more long typing coding, but this assure that every person that read your code will understand from which package your are using a specific class.


Recommended readings:


viernes, 17 de julio de 2020

Redundant imports in Java


@builtbymath 


When you are creating a class in Java you can import packages with the "import" clause, for example:

import java.util.Random;

public class Blogger {
public static void main(String[] args) {
Random random = new Random();
System.out.println(random.nextInt(9));
}
}

In this case we are importing the class "Random.java" from the package util.
But java allows us to import multiple packages, even we can have multiple redundant import declarations in a class, as follows:

import java.util.Random;
import java.util.Random; //Redundant import clause

public class Blogger {
public static void main(String[] args) {
Random random = new Random();
System.out.println(random.nextInt(9));
}
}

This class will compile without any problem, and will print a random number between 0 and 9.

Another type of redundant import is when you import a class that is in the same package, for example,  suppose that you have a class "Comment.java" and "Blogger.java" in the package "mysite". it is not necessary to have the clause "import mysite.Comment" in the class "Blogger.java", as follows:

package mysite;

import java.util.Date;

import mysite.Comment; //Redundant import clause

public class Blogger {
public static void main(String[] args) {
Comment mycomment = new Comment("My comment for today", new Date());
System.out.println(mycomment.getCommnet());
}
}


package mysite;

import java.util.Date;

public class Comment {
private String comment;
private Date date;

public Comment(String comment, Date date){
this.comment = comment;
this.date = date;
}

public String getCommnet(){
return this.comment;
}

public Date getDate(){
return this.date;
}
}

this type of import as mentioned before it is not necessary since Java will automatically look for the classes that you are using in the same package.

So be careful with the way you import classes in java, even though many modern IDE can help you to automatically import package and classes, it is good to know and understand  this types of redundant imports because it can be a great help if you are facing an interview or solving a certification exam.

Recommended readings:
Reference:

jueves, 19 de diciembre de 2019

¿C贸mo Sling resuelve las peticiones Http?

Para entender c贸mo Sling resuelve las peticiones Http vamos a seguir un ejemplo b谩sico que consta de la creaci贸n de un componente que va a ser renderizado en nuestro navegador.
Photo by Hello I'm Nik 馃嚞馃嚙 on Unsplash

Antes de esto vale la pena destacar que al ser Sling un web framework orientado a recursos, toda petici贸n Http debe apuntar a un recurso (ya sea un nodo JCR, un archivo o una base de datos), por lo tanto, si al momento de resolver la petici贸n http Sling  no encuentra un recurso para esa petici贸n, devolver谩 un error 404 indicando que el recurso no se encuentra disponible.

Una vez explicado esto  procedamos con la creacion de nuestro ejmplo, para esto vamos a usar CRXDE-Lite, el cual es un entorno de desarrollo o un visualizar de nodos JCR que AEM trae integrado.
Podemos acceder a este desde la pagina de inicio de AEM, ingresando a localhost  (http://localhost:4502/aem/start.html), luego hacemos clic en el icono de herramientas, luego clic en General y finalmente clic en la tarjeta CRXDE-Lite, como se muestra en la siguiente imagen:


o simplemente digitamos en nuestro navegador: http://localhost:4502/crx/de/index.jsp#, esto nos llevara a una pagina como la que se muestra a continuaci贸n:


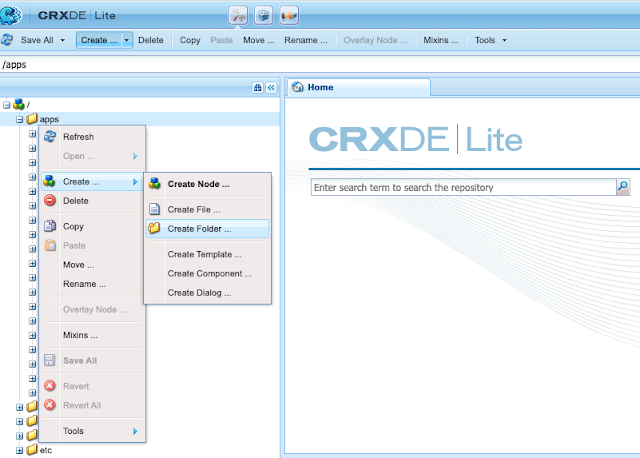
Una vez aqu铆, procedemos a crear una carpeta la cual contendr谩 nuestro ejemplo, para esto expandimos el nodo apps, hacemos clic derecho y luego en crear nuevo folder,  y le ponemos el nombre miejemplo:


Realizando este mismo proceso, vamos a crear varias  carpetas mas dentro de la carpeta miejemplo, primero creamos la template, luego  creamos carpeta components, dentro de esta creamos la carpeta structure, y la carpeta con el nombre content, nos quedar铆a algo as铆, (RECUERDA DALER CLIC EN SAVE ALL UNA VEZ HAGAS TUS CAMBIOS):
->miejemplo
       -> componentes
            -> structure
             -> content
      -> template


Una vez creamos la estructura de nuestras carpetas, procedemos a crear nuestro componente, para esto hacemos clic derecho sobre la carpeta structure, luego clic en crear, crear component:


Procedemos a llenar la information que nos solicita:
En Label: ponemos mipagina, la cual sera el nombre del node JCR
En Title: para simplicidad ponemos mipagina
En Descipction: ponemos una breve descripci贸n de nuestro component y
Finalmente en Super Type ponemos el component que se va a renderizar en nuestra pagina web que en este caso es un componete page del core wcm/foundation de AEM 


Finalmente nos quedar谩 algo como se muestra en la siguiente imagen:


Como podemos observar CRXDE nos crea por defecto un scritp jsp con el mismo nombre de nuestro componente. Adobe a partir de las nuevas versiones de AEM introdujo HTL como  nuevo lenguaje de programaci贸n para la creaci贸n de los componentes, es bueno seguir esta recomendaci贸n por lo tanto procedemos a renombrar este archivo mipagina.jsp a mipagina.html, y  reemplazamos su contenido por el siguiente:

<html>
<head>
    </head>
    <body>
    <h1>Hola desde el componete mipagina en AEM</h1>
    </body>
</html>


Para poder renderizar nuestro componente necesitamos crear un nodo que apunte a nuestro componente, para esto vamos a la carpeta content en la raiz de CRXDE-Lite, y creamos un nuevo nodo como lo indica la siguiente imagen:


Hay que recordar que toda petici贸n http debe estar mapeada a un recurso en AEM, por esto es necesario indicarle al nodo que acabamos de crear que el componente que va a renderizar es el componente mipagina, esto lo hacemos asignandole a la propiedad sling:resourceType la ruta de nuestro componente  mipagina (/apps/miejemplo/components/structure/mipagina):


Una vez hecho esto, podemos ver nuestro componente renderizado en el navegador,  para esto, vamos a  nuestro navegador y en nuestra instancia local de AEM le agregamos la ruta del nodo que creamos previamente, agregandole la extension que queremos renderizar /content/muestramipagina.html que en este caso es .html, nuestra ruta final quedar铆a de la siguiente manera:  http://localhost:4502/content/muestramipagina.html

Y es de as铆 como finalmente podemos ver nuestro componente renderizado:


Una vez tenemos listo nuestro componentes, vamos a explicar como sling resuelve estas peticiones a trav茅s de una series de pasos:
  1. Primero Sling descompone la URL(http://localhost:4502/content/muestramipagina.html)
    • primero determina el protocolo http
    • luego el  host y el puerto localhost:4502
    • luego la ruta del nodo en la carpeta content content/muestramipagina
    • Si hay selectores extrae los selectores, en este caso no tenemos selectores pero si los hubiera seria todo lo que hay antes de la extension .html y despu茅s de content/muestramipagina, ser铆a algo como: content/muestramipagina.selector1.selector2.html
    • y por ultimo la extension, cabe destacar que aparte de la extension pueden haber sufijos y parametros de la forma content/muestramipagina.selector1.selector2.html/sf1?id=123
  2. Seguido de esto Sling  buscar铆a una URL o Servlet que redireccionar铆a nuestra petici贸n pero como este no es el caso pasamos al siguiente paso
  3. El cual seria buscar el nodo indicado en la URL el cual ser铆a content/muestramipagina
  4. Si el nodo existe Sling procede a resolver el recurso solicitado usando la propiedad sling:resourceType
  5. Finalmente Sling procede a resolver el script de renderizado e imprimirlo en nuestro navegador, para este caso ser铆a el script por defecto mipagina.html
En resumen, estos son los pasos b谩sicos que lleva a cabo Sling  para resolver las peticiones Http, falta mencionar el caso cuando hay selectores, este caso lo veremos en futuros pots.

Muchas gracias por su atenci贸n, sientanse libres de corregirme cualquier error o solicitarme alguna mejora.

Lecturas recomendadas

  1. ¿Que es AEM?
  2. ¿Que es un Componente en AEM?
  3. ¿Que es un Template en AEM?
  4. Arquitectura de AEM


mi茅rcoles, 18 de diciembre de 2019

¿Que es un Template en AEM?

Template en AEM son los modelos predise帽ados que creamos de nuestras paginas web, estan compuesto por componentes y son usados esencialmente para crear paginas web y para construir el contenido inicial en un proyecto AEM.

Photo by Tim Arterbury on Unsplash


Algunos atributos y propiedades que podemos encontrar al momento de crear un componente son las siguientes:

  • label: esta propiedad representa el nombre del template 
  • sling:resourceType : define el componente que se va a renderizar y obligatorio asignar esta propiedad en cada nuevo template que crear
  • jcr:title : esta propiedad representa el titulo que el analista encargado de authoring ve al momento de crear una nueva pagina
  • jcr: description : es usado normalmente como documentaci贸n del template o para de describir la funcionalidad del componente
  • ranking: Define el orden en el que un template se ver谩 en AEM
  • allowedPaths:  en esta propiedad podemos agregar la rutas jcr en las cuales el template podr谩 ser utilizado
Lecturas recomendadas

martes, 17 de diciembre de 2019

¿Que es un Componente en AEM?

Components en AEM son unidades  modulares y reusables  que implementan funcionalidades o l贸gica especifica para renderizar un sitio web,  los componentes en AEM no son mas que nodos JCR que estan compuestos por una series de scripts (.java, .jsp, .js, .html) los cuales  realizan una tarea especifica con base en ciertas propiedades que podemos parametrizar cuando creamos cada componente.
Photo by Robin Glauser on Unsplash


Una de las propiedades mas importantes al crear un component en AEM es la propiedad sling:resourceType la cual nos indica el componente que se va a renderizar en nuestra pagina web, por lo general en esta propiedad indicamos componentes core por defecto que AEM trae predise帽ados tales como: breadcrumb, text, tabs, carousel etc. 
Cabe destacar que cada desarrollador puede crear sus componentes personalizados con base en estas propiedades, modificando el script por defecto de cada componente.

Para tener una idea de como se ve un componente en AEM podemos echar un vistazo a los componentes core que AEM trae por defecto en la siguiente ruta: core/wcm/components


Como podemos observar, cada componente pose ciertos scripts que pueden ser modificados para proveer la funcionalidad que se requiera, por lo general estos scripts son tel tipo html, javascript y archivos java servlet, adicionalmente cada componente pose una series de nodos anidados como podemos ver en la imagen los cuales son los cq:dialog y los ca:design_dialog, los cuales nos sirven para definir ciertas propiedades que el usuario de Authoring puede definir en nuestro componente.

As铆, estos serian los componentes que ver铆amos renderizados en nuestra paginas web, o que el analista encargado de realizar el Authoring tendr铆a disponible para crear los templates que luego se utilizan en la creaci贸n de las paginas web.